What is the YUM?
Yellowdog Updater, Modified, or YUM is apackage management tool for installing, updating, removing and managing dependencies of software packages for Linux distributions, based on RPM format packages.
History
In 1999—2001 YUP (Yellowdog UPdated) was created by Terra Soft Solutions. However later on, YUP was completely rewritten into YUM by Seth Vidal and Michael Stenner to manage the Red Hat Linux systems at Duke University. Nowadays, YUM isadopted as a basic package manager in Red Hat, CentOS, Fedora, Oracle Linux, and many other RPM-based operating systems.
YUM uses CLI (Command-Line Interface), together with other tools that provide the GUI (Graphical user interface). YUM for RPM is not inferior to the much popular APT for Deb in its capabilities. Like an APT, manager YUM works with package repositories from a distributor or a third party.
RPM packages
RPM packages are files, containing arbitrary files and system information about them. Most of the packages are binaries (RPMs). They contain compiled versions of some software. There are also packages, containing source code files called SRPMs (Source RPMs).
Check out the Packagecloud free trial to see how easy it is to distribute packages throughout your entire organization. Never worry about the scaling, consistency, or security of your packages again.
Packagecloud is a cloud-based service for distributing software packages to your machines and environments. Packagecloud enables users to store all of the packages that are required by their organization, regardless of OS or programming language, and repeatedly distribute them to their destination machines.
This enables users to efficiently, reliably, and securely set up and update machines without owning any of the infrastructure that is typically required to do that.
Tutorial
In this tutorial, we are going to build a package for the YUM from the source code. This can be easily installed by anyone onto their system. Internally, YUM depends on the RPM application. The RPM application is also a package manager, but it slightly differs from YUM.
YUM resolves additional dependencies and installs them automatically while the installation is in process, in contrast to RPM, which only alerts about required packages. RPM allows you to install multiple versions of an application, while YUM does not. We will build an RPM package that can also be used by other RPM-based package managers, and not only by the YUM.
Preparations
To build a package, first, we need to install a special toolkit.
We can perform it by executing the following command:
$ yum install -y rpm-build rpmdevtools
This command will also install additional dependencies. After the successful execution, you should have all the needed tools on your local machine.
Step 1. Build directories
Next, we need to define a special directory structure, which will be used during building a package. It can be done with the following command from the rpmdevtools package:
$ rpmdev-setuptree
It will create an rpmbuild directory with the following directory structure:
$ tree rpmbuild/
rpmbuild/
|— BUILD/
|— RPMS/
|— SOURCES/
|— SPECS/
|— SRPMS/
To clarify what these folders are used for:
BUILD — contains files created while package building.
RPMS — contains RPM binaries, in subdirectories for different architectures. For example, x86, x86_64, etc., or noarch for architecture-independent binaries.
SOURCES — contains source code archives.
SPECS — contains SPEC files.
SRPMS — contains RPM sources, it can be used to build package binaries (RPM installer).
Step 2. Preparing source code for packaging.
Next, we need to prepare our sources to make the package from.
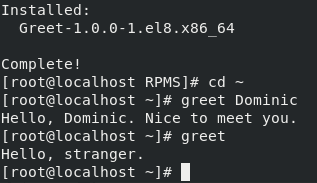
For this, we have created a simple greet application on C. It accepts a person’s name as a first argument and greets him.
Our source code is simply a .c file with the main() function:
#include <stdio.h>
#include <string.h>

int main(int argc, const char *argv[]) {
   if (argc > 1) {
       printf("Hello, %s. Nice to meet you.\n", argv[1]);
   } else {
       printf("Hello, stranger.\n");
   }
}
With a simple Makefile:
all:
   gcc -g -o greet greet.c

install:
   mkdir -p $(DESTDIR)/usr/local/bin/
   install -m 0755 greet $(DESTDIR)/usr/local/bin/greet
Next, we should put sources in the archive. It can be done by executing the following command:
$ tar -czvf <archive-name>.tar.gz <sources>...
Step 3. Making a SPEC file.
SPEC file is a core of the RPM package. It contains instructions that tell the package manager what to do. This file is like a recipe to make a package.
To create the SPEC file from a template go to <your-package-folder>/SPECS and execute the following command:
$ rpmdev-newspec <app-name>
It will create the <app-name>.spec file with basic template (unless <app-name> argument provided the newpackage.spec will be created).
SPEC file consists of two general sections: preamble and body.
The preamble contains package metadata, it can be used while the installation is in process. The body contains the main set of instructions for the package, for installation or removing processes, etc. To differentiate the body directives start with the “%” character.
Let’s review each of the directives.
Preamble directives:
Name — The name of the package (should match with SPEC file name).
Version — The version number of the package.
Release — Displays how many times this version of the package was released.
Summary — A brief description of the package.
License — The license of the package’s software.
URL — The URL to the software website.
Source — Path to compressed software source code. If needed, it is possible to add more directives (Source0, Source1 … SourceX).
BuildRequires — The list of required packages while build is in process. For example, a compiler is used to build a package from sources, written on the compiled programming language.
Requires — The list of required packages to run target software.
BuildArch — Defines the target architecture of a package. Default is the current system architecture.
Body directives:
%description — Full description of the package.
%prep — Describes command or list of commands to prepare the package to a build. For example, extracting source code from compressed archives.
%setup — Macro, which unpacks package sources.
Here are a few useful flags:
-q — quiet mode, for minimal output.
-c — Creates directory that source code unpacks to.
-n — Sets the name of the build directory.
%build — Describes command or list of commands that execute while the build is in process.
%make_build — Macro that is equivalent to “make %{?_smp_flags}”.
%install — Contains commands to copy built files to build root, usually, using the install command.
%make_install — Macro that is equivalent to “make install DESTDIR=”%{?buildroot}”.
%clean — Contains commands, performing clean-up after the build.
%files — A section, containing a list of files installed in the system by the package.
%license — A sub-directive of %files, containing a file with a license.
%doc — A sub-directive of %files, to specify documentation files.
%changelog — Contains the package changes between updates.
Here is SPEC file for our Greet package, after editing the initial:
Name:  		Greet
Version:    	1.0.0
Release:    	1%{?dist}
Summary:    	Accepts a person’s name as a first argument
and greets him.
License:    	GPL
Source:    	greet.tar.gz
BuildArch:	x86_64
BuildRequires:gcc make

%description
Accepts a person’s name as a first argument and greets him.

%prep
%setup -q -c

%build
%make_build

%install
rm -rf %{buildroot}
%make_install

%files
%license license
/usr/local/bin/*

%changelog
* Tue Apr 16 2021 root
- Released version 1.0.0
You should customize it for your own package.
It’s possible to do without the Make tool and %make_build / %make_install macros, these can be easily substituted by a series of commands. For instance, without these macros in the SPEC file above %build and %install sections would look like that:
%build
gcc -g -o greet greet.c

%install
rm -rf %{buildroot}
mkdir -p %{buildroot}/usr/local/bin/
install -m 0755 greet %{buildroot}/usr/local/bin/greet
Step 4. Building a .rpm file.
After writing the “recipe” for our package, we are ready to “cook” it.
To build the package from SPEC file execute the following command:
$ rpmbuild -bb <path-to-your-specfile>
-bb flag means that we are going to build only a binary RPM package. There are options such as -bs flag which builds only source RPM and -ba which builds both.
Since the build process has finished, .rpm files will be created in RPMS and SRPMS directories, depending on the build mode choice.
Step 5. Testing the package.
Next, we shall try to install our package. It can be done by the following command:
$ yum localinstall <path-to-rpm-file>
Finally, after successful installation, the application can now be used.
Conclusion
This is a basic introduction to RPM package building. Real-world packages aren’t built in a global environment with a “root” user, you will need a separate clean environment. It can be done by the mock tool. Check our article about how to build a package using mock. Packagecloud is a cloud-based service for distributing different software packages in a unified, reliable, and scalable way, without owning any infrastructure.
You can keep all of the packages that need to be distributed across your organization's machines in one repo, regardless of OS, or programming language. Then, you can efficiently distribute your packages to your devices in a secure way, without having to own any of the infrastructure involved in doing so. This enables users to save time and money on setting up servers for hosting packages for each OS. Packagecloud allows users to set up and update machines faster and with less overhead than ever before.
Sign up for the Packagecloud free trial to get your machines set up and updated easily!
For those who have faced building a package for other managers, in general, the process may seem similar. Now, that you know how to build a package with your own software for YUM. We hope that it isn’t difficult and that you are able to do it successfully.