Table of Contents
- Overview
- Nomenclature
- Create an account and repository on Packagecloud
- Your GitHub Actions experience with Packagecloud
- Create or fork a codebase that creates a package
- Add/Modify the .yml workflow configuration file
- Create a .github/workflows directory in root
- Create a .yml workflow file inside the workflows directory
- Name the workflow and specify the trigger
- The build job: define and set up the runner
- The build job: build and ‘upload’ the generated artifact for use in future jobs
- The deploy job: define and set up the runner
- The deploy job: ‘download’ the generated package from the previous job
- The deploy job: use the `upload-packagecloud` GitHub Action to deploy to a Packagecloud repo
- Example of a complete minimal GitHub Actions .yml workflow file contents
- Confirm build passed
- Confirm package push
Overview
Many companies implement a continuous integration (CI) strategy to deploy, build, test and release code incrementally. Once a release is ready, it will be tagged with a version and published to a repository where it can be easily installed with a few clicks by the user. There is no simpler and better repository than Packagecloud for 2 reasons:
1. Packagecloud has integrations with many CI platforms with step-by-step instructions like this one for GitHub Actions
2. Users can easy install those packages with Packagecloud’s install scripts, removing the need to understand the operating system where the package will be installed
To integrate your GitHub Actions workflow with Packagecloud, here are the steps:
1. Create an account on Packagecloud, and then create a repository to store the software package that we build
2. With a GitHub repository with a codebase to build a package, create the .github/workflows directory and .yml workflow file inside.
3. Set up the environment, actions and commands in the job to build the package.
4. Use the upload-packagecloud GitHub Action in setting up the deploy job to push the package to a Packagecloud repository.
Nomenclature
We use the word repository to refer to a code repository, e.g., GitHub, and also a package repository, e.g., Packagecloud. We use the term package to refer to both software or programming libraries that maintainers/creators create for usage by others, with the subtle difference being the former refers to a piece of software that the end-user can use, e.g., a Slack desktop client, and the latter can be used as building blocks by developers to create software.
1. Create an account and repository on Packagecloud
2. You can create a new Packagecloud account here: https://packagecloud.io/users/new.
3. Once you’ve created an account, there is a simple wizard that will guide you through to create a repository to store your packages.
4. If you have already completed the wizard before and would like to create a new repository, login and go here: https://packagecloud.io
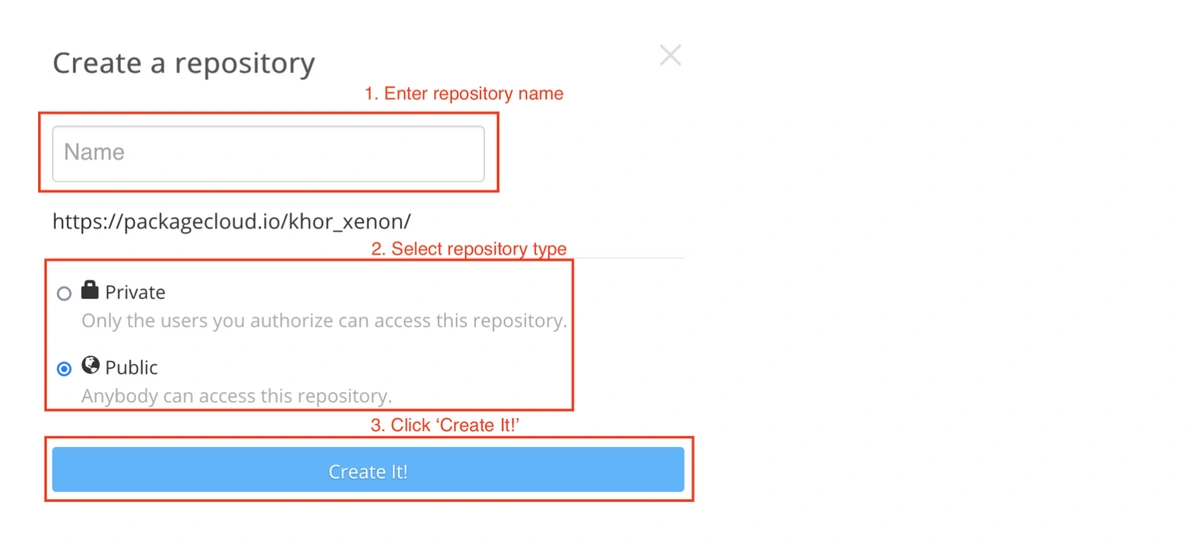
5. Click ‘Create a repository’
6. In the ‘Create a repository’ modal, fill in the details as follows:
Your GitHub Actions experience with Packagecloud
You could be in one of 3 situations here:
Situation 1:
You already use GitHub Actions to continuously build & test your code so you already have the .yml workflow file in .github/workflows. You are looking to push your package to Packagecloud for distribution to your end-users.
Situation 2:
You have a codebase that can only build a package. You are looking at setting up continuous integration with GitHub Actions to continuously build, test and push your package to Packagecloud for distribution to your end-users.
Situation 3:
You don’t have a codebase to build a package but want to get an idea of what such a codebase and continuous integration with GitHub Actions and Packagecloud looks like.
Create or fork a codebase that creates a package
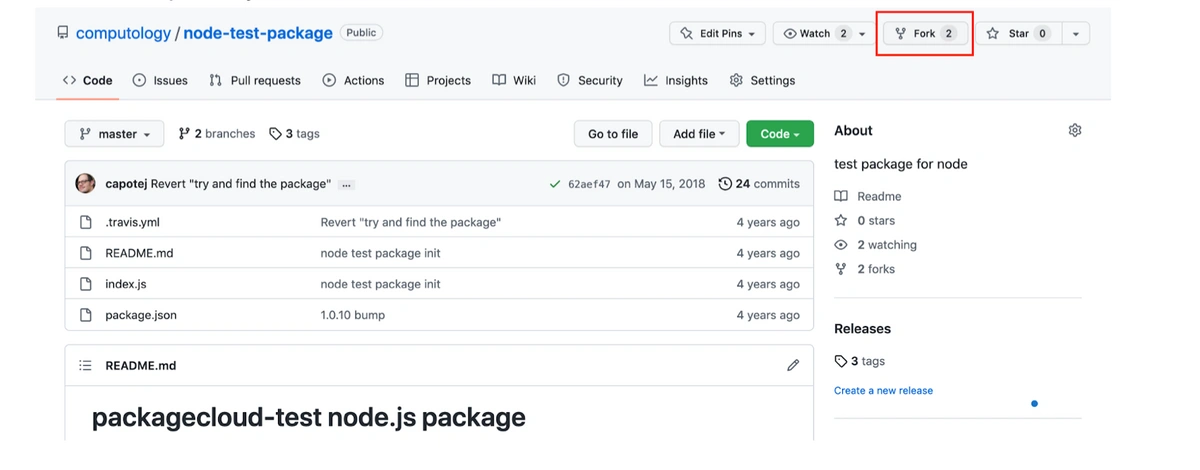
1. If you have no codebase (Situation 3), you can fork a Packagecloud GitHub code repository that we created to build an npm test package.
2. Go to the repository and click ‘Fork’
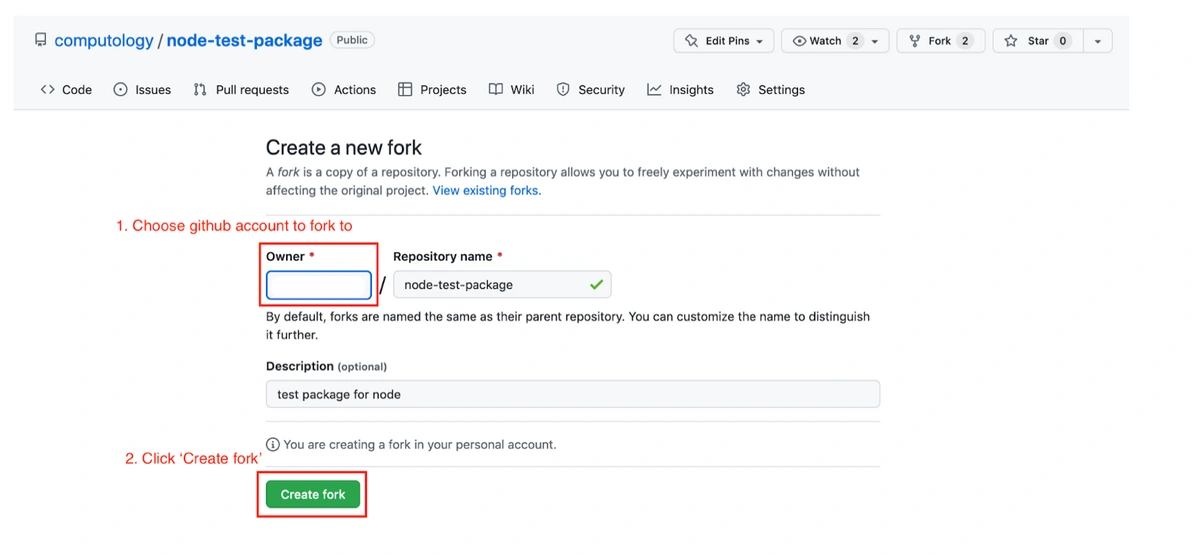
3. Fork the repository to another GitHub account
Add/Modify the .yml workflow configuration file
Here is a sample config of how to integrate GitHub Actions into your codebase to build and publish your package to packagecloud.io.
Create a .github/workflows directory in root
This is where you can create your workflow .yml files to configure your CI/CD steps.
Create a .yml workflow file inside the workflows directory
If needed, create a .yml file with a relevant name (i.e, ‘build-and-deploy.yml’).
Name the workflow and specify the trigger
Specify a name for the workflow.
Use `on` to define which events will automatically trigger the workflow to run. The example below uses `push` to trigger the workflow whenever a push is made to any branch in this repository.
You can add additional events to trigger multiple workflows, like `pull_request`, `fork` and so on.
Example:
name: Build and Push to Packagecloud
on: [push]
The build job: define and set up the runner
Define the runner using `runs-on`, setting it to the appropriate type of machine/container that will process a job in your workflow, like `ubuntu-latest`.
Use official GitHub Actions to perform necessary commands in my environment, such as:
- `actions/checkout` to checkout the npm repo,
- `actions/setup-node` to install `node`, with the `node-version` (e.g. 12, 14, 16).
Example:
jobs:
  build:
    runs-on: ubuntu-latest
    steps:
    - uses: actions/checkout@v3
    - uses: actions/setup-node@v3
      with:
        node-version: 14
The build job: build and ‘upload’ the generated artifact for use in future jobs
Include the `npm pack` command to have the package built in the runner.
Optional: add a `run: ls` step to ‘see’ the generated package in the runner.
As artifacts and files generated in one job do not carry over into the next job by default, use the `upload-artifact` action to upload the generated npm package for use in the next job.
Under `with`, provide two parameters:
- `name`: an identifier for the package (e.g. `npm-package`)
- `path`: where the artifact is located. If it is to be built in the root, simply the package name will be sufficient.
Example:
    - run: npm pack

    - run: ls

    - uses: actions/upload-artifact@v2
      with:
        name: npm-package
        path: packagecloud-test-1.0.10.tgz
The deploy job: define and set up the runner
Use `needs` to identify that the `build` job must be completed successfully before this current job will run.
Define the runner using `runs-on`, setting it to the appropriate type of machine/container that will process a job in your workflow, like `ubuntu-latest`.
Example:
  deploy:
    needs: build
    runs-on: ubuntu-latest
The deploy job: ‘download’ the generated package from the previous job
Download the package from the last job using the `download-artifact` action.
Match the `name` parameter with the one that was uploaded in the previous job (`npm-package`).
Optional: add a `run: ls` step to ‘see’ the downloaded package in the runner.
Example:
    steps:
    - uses: actions/download-artifact@v2
      with:
        name: npm-package

    - run: ls
The deploy job: use the `upload-packagecloud` GitHub Action to deploy to a Packagecloud repo
GitHub Action created by Packagecloud OSS user Daniel from wlan-pi: https://github.com/danielmundi/upload-packagecloud
The `upload-packagecloud` action needs several parameters set to allow the workflow to communicate the correct data to Packagecloud:
1. PACKAGE-NAME: The filename of the package
2. PACKAGECLOUD-USERNAME: Your Packagecloud username
3. PACKAGECLOUD-REPO: Name of the repository you created in your Packagecloud account
4. PACKAGECLOUD-DISTRIB:
- For Debian or RPM: an OS/dist supported by Packagecloud, like `ubuntu/bullseye` or `centos/5`
- For npm: `node`
- For python: `python`
- For Java JAR, WAR, or AAR: `maven2`
- For Ruby Gems: leave blank
5. PACKAGECLOUD-TOKEN:
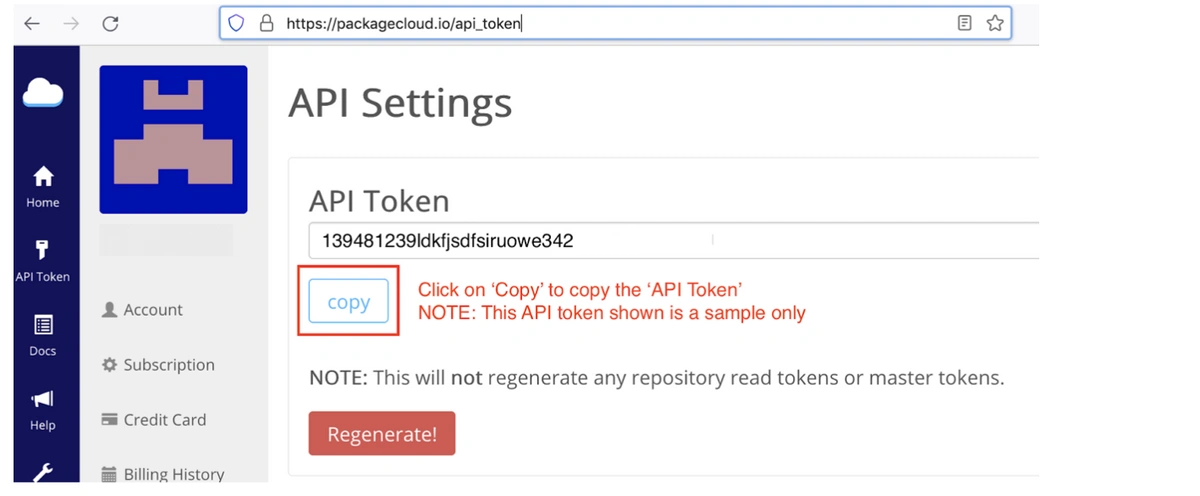
- Your Packagecloud API Token: https://packagecloud.io/api_token
- Using the GitHub CLI in the terminal, set the secret in the repo by running:
`gh secret set PACKAGECLOUD_TOKEN -b "<API-token>"`- Reference the encrypted key:
PACKAGECLOUD-TOKEN: ${{ secrets.packagecloud_token }}
Example of a complete minimal GitHub Actions .yml workflow file contents
This configuration will be triggered on a push to the GitHub repo. It will perform two jobs: build the package, and deploy the package.
# .github/workflows/build-and-push.yml

name: Build and Push to Packagecloud

on: [push]

jobs:
  build:
    runs-on: ubuntu-latest

    steps:
    - uses: actions/checkout@v3
    - uses: actions/setup-node@v3
      with:
        node-version: 14
    - run: npm pack

    - run: ls

    - uses: actions/upload-artifact@v2
      with:
        name: npm-package
        path: packagecloud-test-1.0.10.tgz

  deploy:
    needs: build
    runs-on: ubuntu-latest

    steps:
    - uses: actions/download-artifact@v2
      with:
        name: npm-package

    - run: ls

    - uses: danielmundi/upload-packagecloud@v1
      with:
        PACKAGE-NAME: packagecloud-test-1.0.10.tgz
        PACKAGECLOUD-USERNAME: username
        PACKAGECLOUD-REPO: repo
        PACKAGECLOUD-DISTRIB: node
        PACKAGECLOUD-TOKEN: ${{ secrets.packagecloud_token }}
Confirm build passed
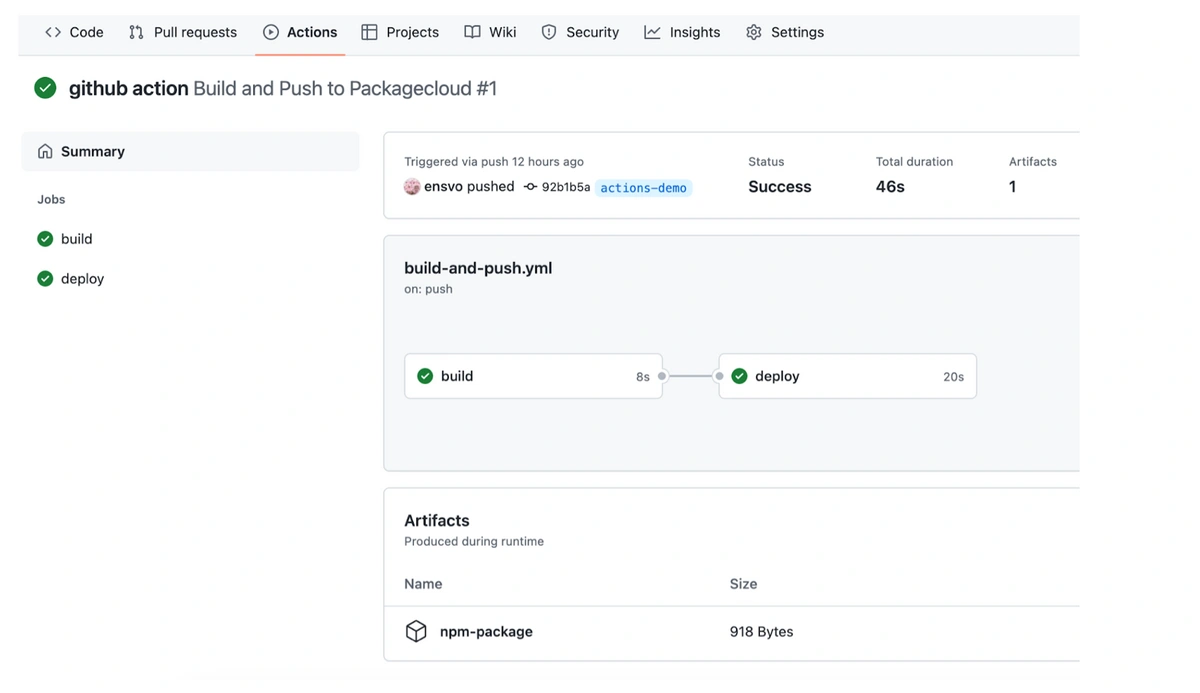
After making a push to trigger the GitHub Action workflow, you can review the job status by clicking on the Actions tab in your repo.
Clicking on the workflow produces a summary of the jobs run and artifacts generated:
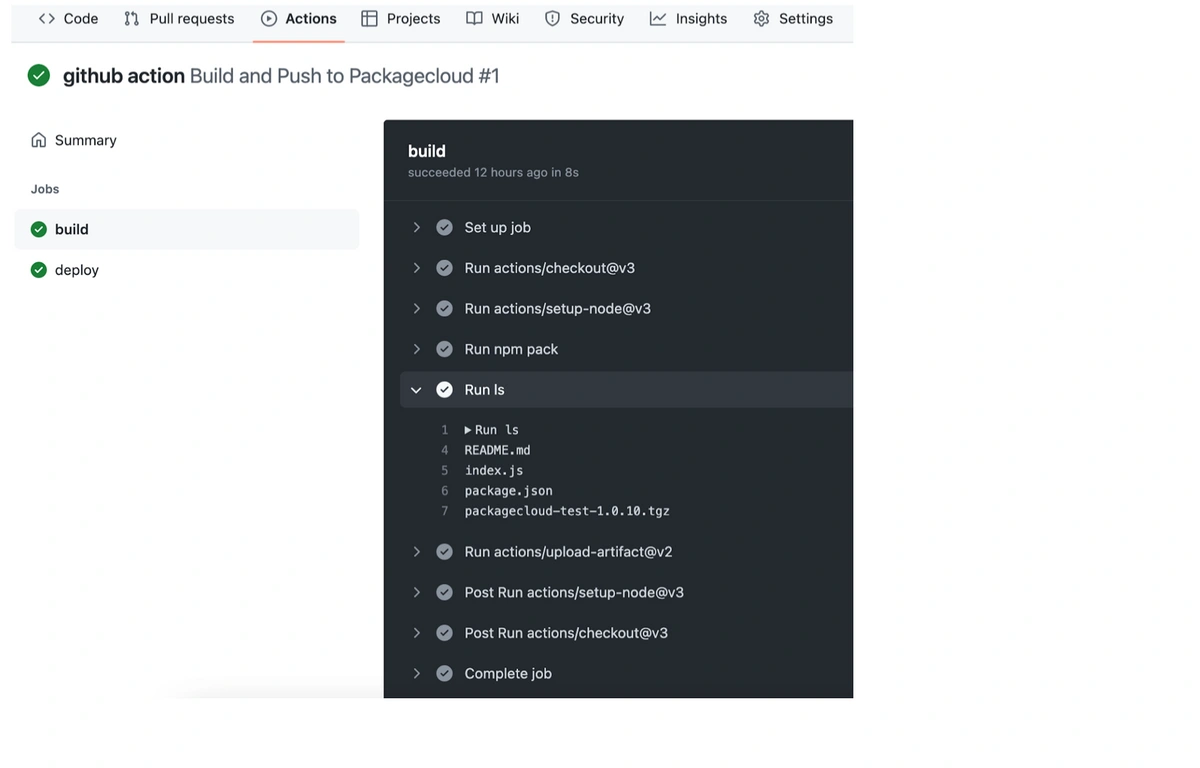
For each job, the output from steps/commands taken can be reviewed by expanding the action. By running `ls`, we can confirm the previous `Run npm pack` step produced the package:
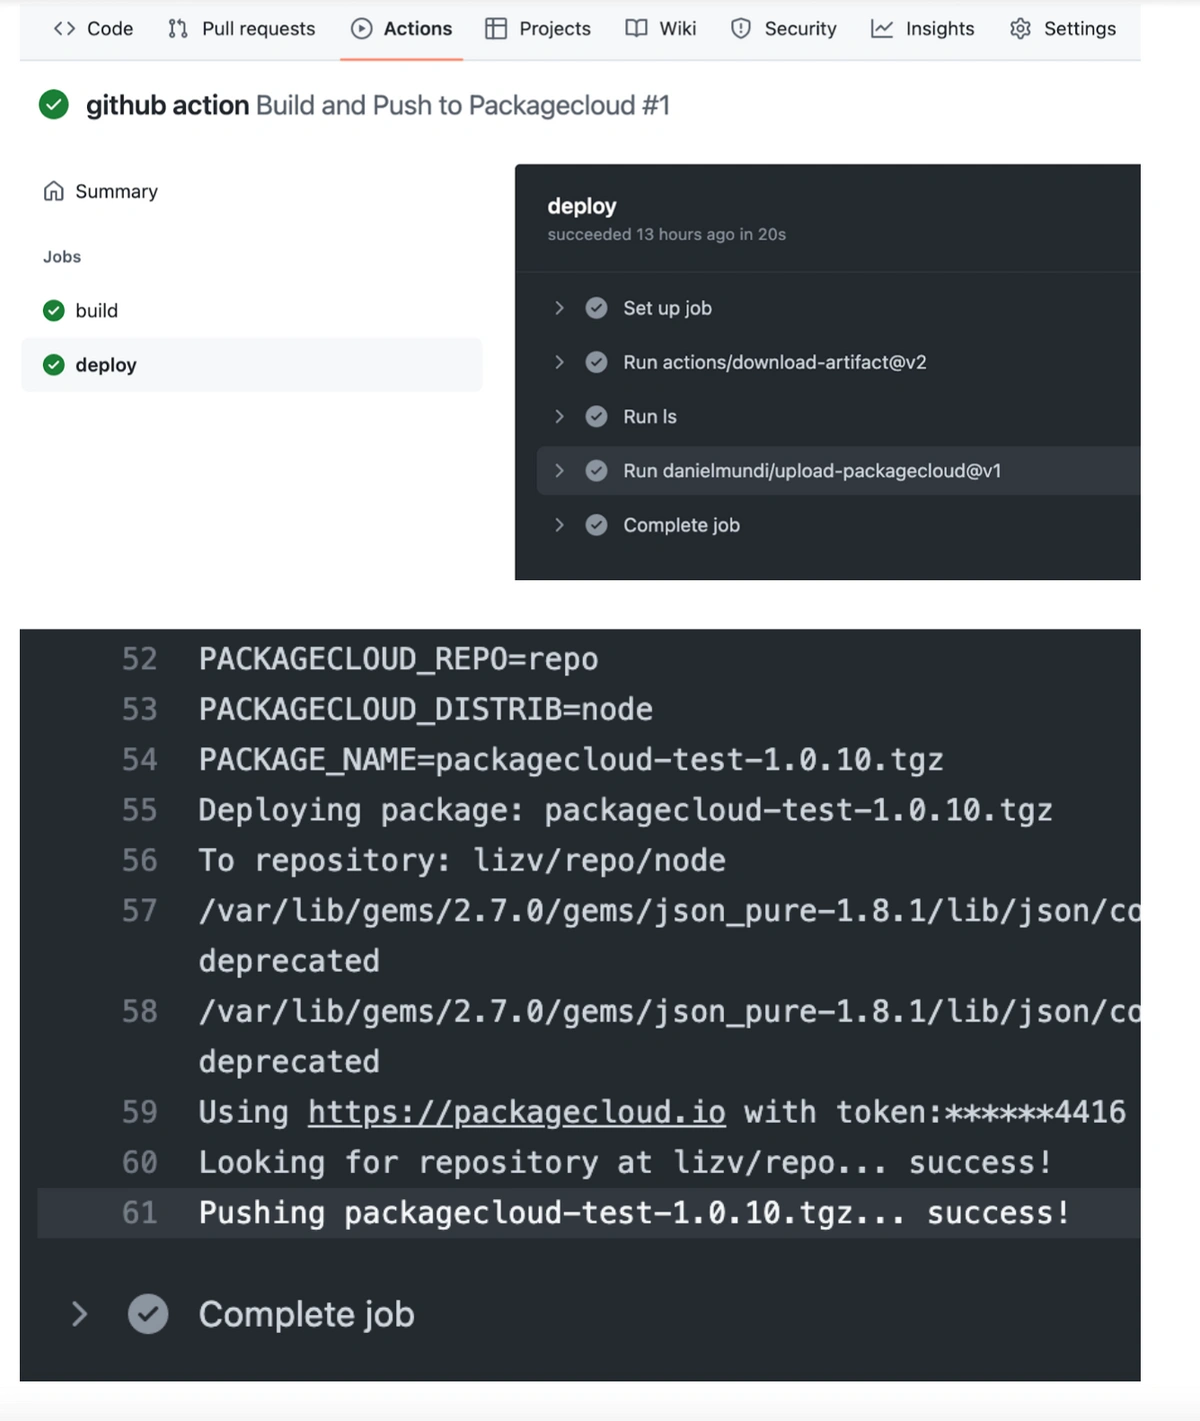
In the deploy job, expanding the `Run danielmundi/upload-packagecloud@v1` step will show a successful upload, similar to our CLI tool:
Confirm package push
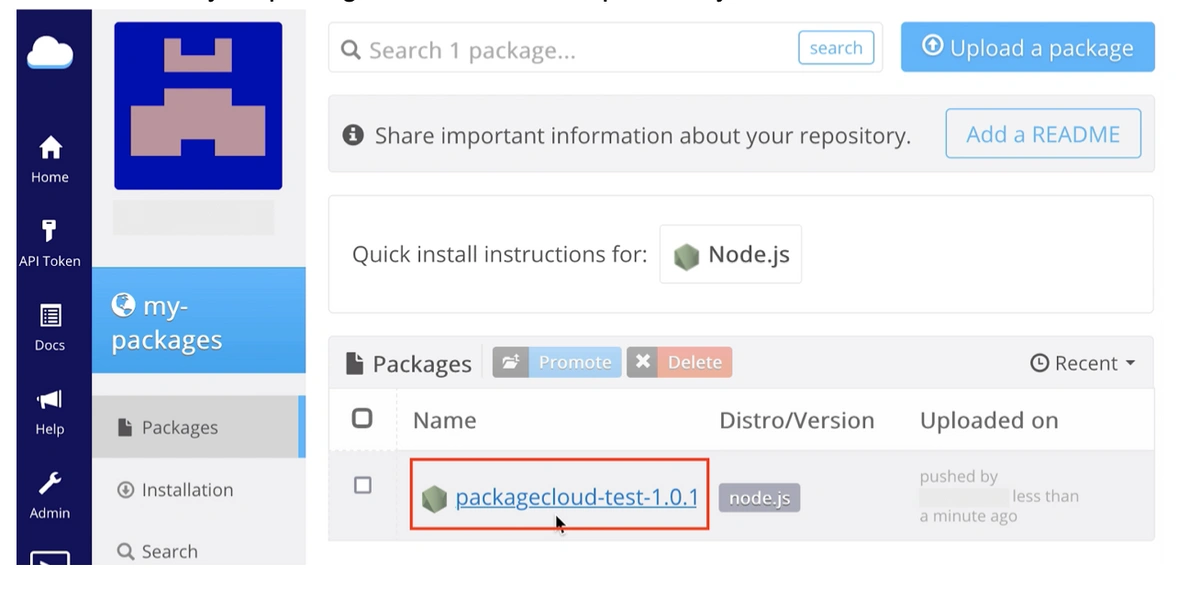
Go to your Packagecloud repository with the url: https://packagecloud.io/<PACKAGECLOUD_USERNAME>/<PACKAGECLOUD_REPONAME>/
You should see your package that was built and pushed by the GitHub Action workflow.


